Tuesday, May 1, 2012

TWD - Hungarian Shortbread


A beautiful treat perfect for a Spring afternoon with a cup of tea.
I've been really busy in the kitchen lately developing a chicken salad recipe to use for a special young woman's wedding shower and making homemade ice cream with all the toppings for an extended family gathering, both of which you can read about later, so Tuesday surprised me again.

Take a deep breath!  Relax.  You can do it.  And I did...

As we continue our Tuesdays with Dorie adventure our project for today is Hungarian Shortbread found on page 327 of the book or on the blogs of our hostesses Lynette of 1smallkitchen and Cher of The not so exciting adventures of a dabbler….  This was a relatively easy recipe and it was made even easier because my procrastination allowed me to benefit from the tips of the early starters (I'll share those in a bit later).

This recipe had two parts, both of which could be made the day before (or earlier) if desired.  The first part was the rhubarb filling.  I was pretty excited about this because I haven't had much experience with rhubarb.
You simply cut it up...
add sugar, water and a vanilla bean


and simmer until it all "melts".  Remove the vanilla bean and you have your rhubarb jam.

The second part is a shortbread dough.  It is put together in the typical way

with the standard ingredients,

divided into two parts,


and shaped into logs and put in the freezer for at least 30 minutes.

The special "tricks" that I learned by waiting until a lot of the others in the group had already tried the recipe kick in at the next step.

Line the pan with parchment
(I only made a half recipe)
Use a food processor to grate the dough
(grating the dough was a new technique
to me)

Add the grated dough to the pan.
Push into the corners and lightly pat
into place.  Pre-bake the bottom layer for
about 10 minutes so it won't be soggy.
Spread the pretty red rhubarb jam onto
the bottom layer then add the second half
of the shortbread spreading as before.  Bake
for about 30 minutes more.
Dust heavily with powdered sugar.
Let cool and you are ready to enjoy.

Remove your lightly browned dessert.


This was an interesting and delicious recipe.  I've made shortbread before but never like this.  It will certainly be one that I will repeat with possible variations in the filling.  The leftover rhubarb jam that I made is delicious on toast.  Hope you enjoyed my experience enough to get out the utensils and get busy baking!!!

Friday, April 20, 2012

TWD - Lemon Loaf Cake

(Yes, I do know that it is actually Friday.  My apologies to our hosts Truc and Michelle.  All I can say is that life happens.  Having done all the prep work, I still wanted to post, so here goes.)


When life gives you lemons, 


Make Lemon Loaf Cake (recipe on pages 252-253 of Dorie Greenspan's book, Baking With Julia).  


This is a lovely cake, with a subtle lemon flavor, that could be used for so many things as well as eating just as it is.  If you have all the ingredients, 


you can mix it together in just a few minutes with only a whisk.  No need to get out the mixer.  

First zest some lemons.
Whisk together some eggs, sugar and salt.

Sift in a mixture of flour and
baking powder. Whisk in some
heavy cream. Fold in some melted
 butter and...Wah La!!!
Beautiful Lemon Loaf Cake, baked,
cooled, and ready to slice.


Now you just have to decide how you want to eat it.  It would make a wonderful cake base for Strawberry Shortcake or you could use those zested lemons to make a lemon glaze.  Might even work well in a bread pudding.  It could pair with so many other flavors.  If you were in an experimenting mood, it might be fun to put some basil in the lemon glaze.  It's even delicious toasted.


Just two cautionary notes.  Be sure to actually get out your sifter and sift the flour into the egg mixture.  If you don't you could end up with little pockets of flour that would detract from your beautiful cake.  Secondly, don't over-bake or it will be dry.  Remember that it will continue cooking after you remove it from the oven.


Tuesday, April 3, 2012

TWD - Pizza Rustica


Being the procrastinator that I am, I only saw the name of what we were making this month and made one of those assumptions you aren't supposed to make.  I assumed we would be having pizza.  Now, we just love pizza.  I've been dreaming of how much we would enjoy it.  Well, I finally got around to actually reading the recipe that was hosted by Emily of Capitol Region Dining and Raelynn of The Place They Call Home and it has no resemblance to pizza at all.  Not only that, but my very weakest baking skill is pie and it looked just like pie.  Furthermore, my sweet hubby who tries to eat all of my food experiments doesn't eat pie...any kind of pie.  I suppose I could have chosen to skip this one, but I made a commitment to participate and there wasn't any good reason not to follow through.


I bought all the ingredients for the filling and crust and proceeded to go to work.


The filling was very easy.  It just required a little grating, chopping and mixing.

Ricotta and Eggs
Mozzarella and Pecorino Romano

Prosciutto
Parsley


Aren't the colors beautiful?
Now on to the dough...


Dry Ingredients & Butter (Pulse a little)


Comes together nicely in the food processor.
Portion the dough.
Use a tapered rolling pin for the
round piece.


Drape and press to the buttered dish.

Roll and cut the lattice.  Use a
straight rolling pin to make
the square.

Ready for the oven (I could use a little
lattice practice).


Bottom rack
Now let's see what happens at dinner time.  Will he go for the peanut butter jar?

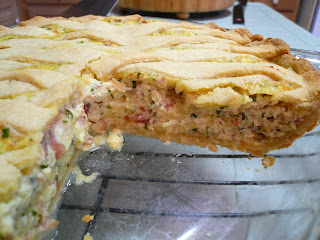
Cutting the first piece
My plate with fresh sautéed spinach
And the final result was a success!!!
There were a couple of things about this recipe that I thought were interesting.  It could be just the way you make this traditional dish (I made it just exactly as directed).
  • The instructions did not include chilling the dough.  My baking instincts worried about this one.
  • There was no information regarding egg washing the crust before putting it in the oven.  I looked at the illustration in the book and it did not look like an egg wash was used.  I think it would be prettier with the browning that an egg wash would produce.
Lots of variations come to mind including:
  • Adding some lemon zest
  • Perhaps some nutmeg
  • Leaving out the prosciutto and adding some blueberries
The recipe can be found on pp. 430 and 431 in the Baking with Julia book or on the blogs of our hostesses mentioned above. 

I can see serving this for breakfast, lunch or dinner.  The leftovers will not go to waste!


Tuesday, March 20, 2012

TWD - Irish Soda Bread


Happy belated St. Patty's Day!  Hope you were able to celebrate with some of the traditional Irish foods.  Our Tuesdays with Dorie / Baking with Julia selection fit right in with the theme.  Carla and Cathleen chose Irish Soda Bread from page 214 of the Baking with Julia book.

I chose to make the bread as presented and had planned to make it again with raisins as another traditional variation, but alas, Lassie, I ran out of time.  You could let your imagination run wild with ways to vary it.  The basic recipe is pretty simple with only four ingredients.


Wait!!!  I only see three!  Maybe you can guess the third.  If not, see if you can spot it a little later on.

Now, don't be scared when it looks like a raggedy mess.


It actually comes together quite nicely with very little effort and no need for a mixer.


Don't forget to slice an "x" in the top before you bake it!


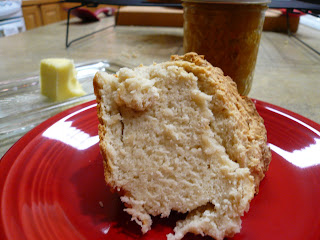
The bread is very dense and went well with the soup we had for dinner.


I had an abundance of apricot lekvar left from the rugelach from a previous post and it added a nice touch to the meal as well.  No dessert needed!!!


The information in the book said that you needed to eat it the same day, but I wrapped it in plastic wrap and it still had some nice moisture to it the next morning so I sliced it and made some cinnamon toast for breakfast.


This recipe was a nice change from the more difficult rugelach that we made earlier. I hope you've discovered the fourth ingredient by now but no need to worry you can always check with out hosts listed above or pick up a copy of the book.

Have fun cooking and I'll try to get another post in before the next Tuesday's with Dorie event.

Tuesday, March 6, 2012

TWD - Rugelach

This week's selection for Tuesdays with Dorie / Baking with Julia is Rugelach, hosted by Jessica of My Baking Heart and Margaret of The Urban Hiker.  Rugelach is a rustic, rich cookie with a butter and cream cheese dough that is filled, rolled, sliced and baked.  


The recipe is on pages 325-326 of the Baking with Julia book or posted on the blogs of the hostesses calls for a filling of apricot or prune lekvar, assorted nuts and dried fruits, and a cinnamon/sugar mixture.  There is a reference to a recipe for the lekvar (which I made) or you can find it at specialty grocery stores or online.


So that's the background, now here is how it went down:  

  • My plan was to make it over the weekend at our lake house.  I got the pastry dough and lekvar made then ran out of time and had to pack it all up in the cooler and bring it back to our other house.  
  • When I made the dough, I broke the cardinal rule of cooking and baking by not measuring all of the flour into a separate prep bowl.  Instead I was putting the three cups of flour directly into the food processor by half cup quantities.  Somewhere in the middle of mixing I was interrupted and lost track of where I was.  I believe I shorted it by a half cup of flour.
  • The apricot lekvar was easy and came together nicely.  I may make it again sometime with some added spices and/or herbs and use it as a spread on toast.  The only problem was that I needed two cups and the recipe said that it made 3/4 cup.  This led me to make 2 1/2 times the recipe so that I would have the right amount plus a little bit left.  As it turns out that one recipe makes quite a bit more than 3/4 cup.  I'm really glad I like it as a spread!!
  • My last mistake was not using a double pan with my second batch.  They burned a little bit on the bottom.  Batches 1, 3 and 4 were double panned and the result was a nice crunchy bottom
All that said, they look kind of sad but still tasted pretty darn good...even better with a glass of milk.


Now that I know the pitfalls, I will probably try to make them again soon and play around with some different fillings.  Nutella or chocolate would be close to the top of my list.